
Kitchen Layout Planning for Cabinets, Sinks and Appliances

The most open kitchen layout isn’t automatically the most practical. Common options include one-wall, galley, L-shaped, U-shaped, G-shaped, peninsula, and island layouts; the right fit depends on your room and how you cook. A useful kitchen layout planning guide also considers the work triangle between the refrigerator, sink, and range, whose three sides should total 13 to 26 feet.
It’s easy to focus first on cabinet style or a statement island, but everyday comfort depends on clear paths, reachable storage, and counter space where you need it. A layout that supports meal prep, cooking, and cleanup can make a compact kitchen feel more organized. A poorly placed island or appliance, by contrast, can interrupt movement.
This kitchen layout planning guide explains how common layouts differ, how cabinet dimensions affect storage, and how sink and appliance placement shape workflow. Use it to weigh your room, cooking habits, and storage needs, then bring those factors together in a practical plan rather than a collection of attractive features.
Table of Contents
Determining cabinet and drawer dimensions
Cabinet dimensions affect storage capacity, counter space, and how easily doors and drawers open. Start with fixed room measurements, then tailor cabinet widths and heights to what each one needs to hold.
Cabinet Depth and Door Width
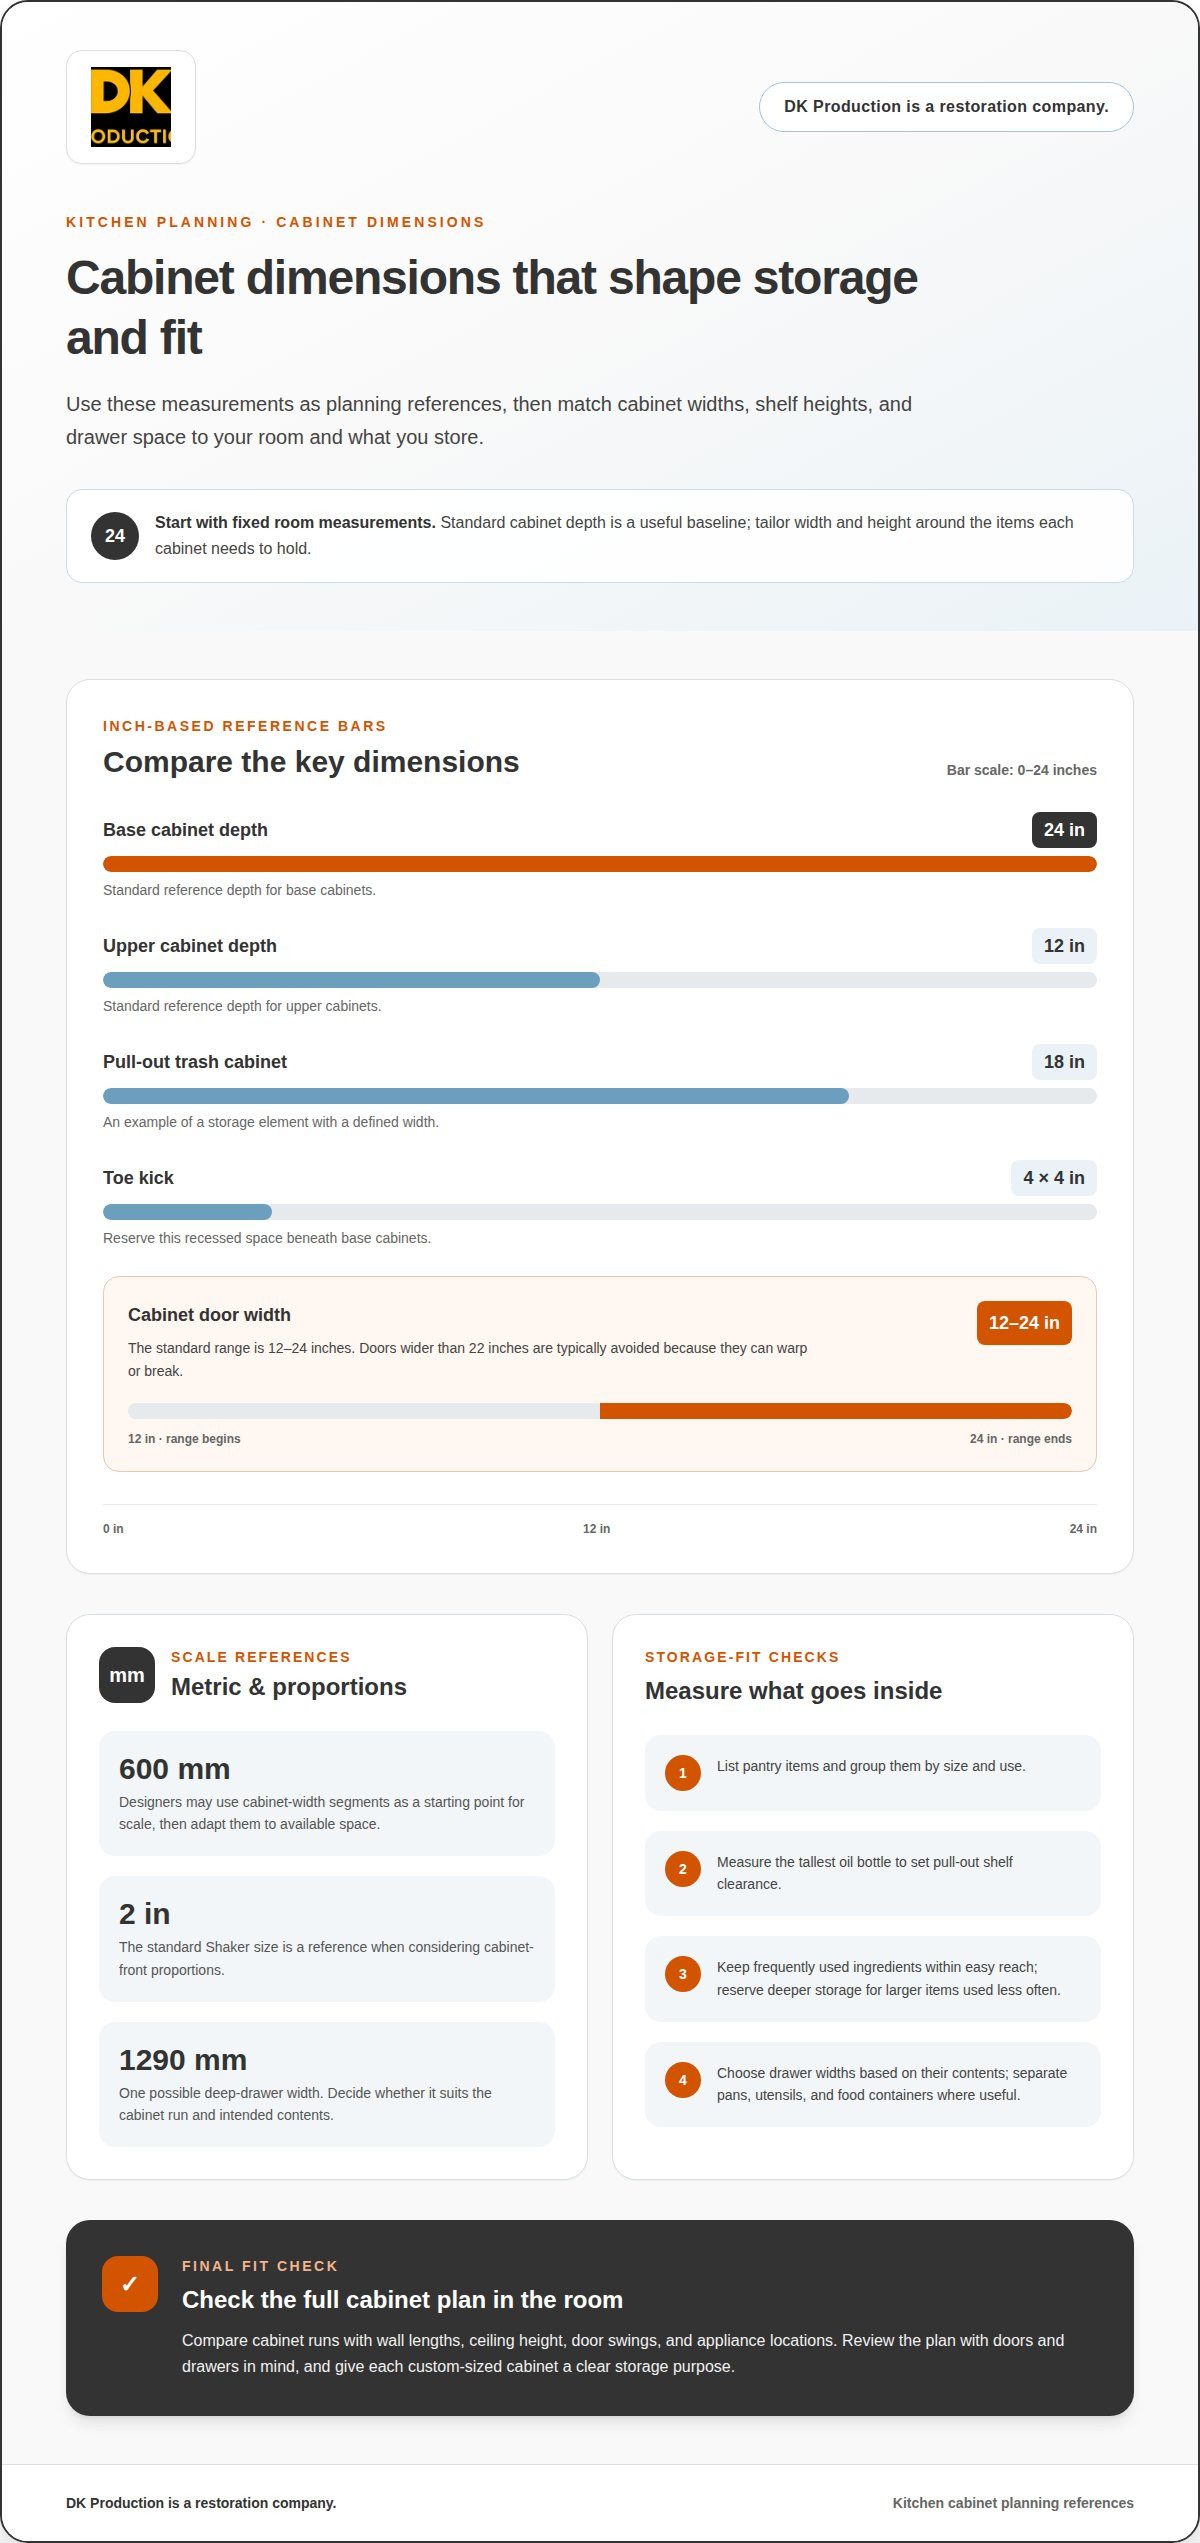
Cabinet depth and door width describe how far cabinets extend into the room and how wide their doors open. Standard base cabinet depth is 24 inches, while standard upper cabinet depth is 12 inches. A toe kick provides recessed space at the base of cabinetry. These dimensions help you map cabinet runs and preserve usable floor space.
Plan door widths around access and function: the standard range is 12 to 24 inches, but doors wider than 22 inches are typically avoided because they can warp or break. An 18-inch pull-out trash cabinet is one example of a storage element with a defined width. Include nearby drawers and appliance openings when deciding where each cabinet fits.
Proportion and Scale
Proportion and scale describe how cabinet sizes relate to the room and to one another. Designers may use 600 mm-wide segments as a starting point for establishing scale, then adapt the plan to the available spaces. The standard Shaker size is 2 inches, a useful reference when considering cabinet-front proportions. Compare those elements against the room’s wall lengths and ceiling height before selecting a repeated pattern.
Cabinet depth is usually fixed, while width and height can be planned around what you store. This distinction helps you decide where standard sizes will work and where a custom-sized cabinet has a clear purpose. A narrow opening, for example, may suit a pull-out, while a wider run can accommodate drawers.
Plan pantry storage by listing what needs a home and grouping items by size and use. Measure the tallest oil bottle to set the clearance for a pull-out shelf. Keep frequently used ingredients within easy reach, and reserve deeper storage for larger items you don’t need every day.
Deep drawers can store cookware and pantry supplies, but width affects how each drawer functions. A 1290 mm-wide drawer is one possible storage option; use its intended contents to decide whether that span is practical in your cabinet run. Separate drawers for pans, utensils, and food containers can make the interior easier to organize.
Use a 24-inch base cabinet depth and 12-inch upper cabinet depth as planning references.
Reserve a 4-by-4-inch toe kick beneath base cabinets.
Measure stored items before setting shelf heights, drawer widths, and pantry spaces.
Check the cabinet plan against the room’s walls, door swings, and appliance locations. A measured cabinet schedule helps you choose storage that fits both the available space and the items you use.
What are the most common kitchen layouts?
Kitchen layouts arrange cabinets, appliances, and work areas to suit the room’s shape. One-wall, galley, L-shaped, U-shaped, G-shaped, peninsula, and island plans each balance movement, storage, and social space differently.
The Kitchen Work Triangle
The kitchen work triangle links the refrigerator, sink, and range, the three main points used during meal preparation. Use it to spot unnecessary backtracking. Keep clear countertop space inside or near the triangle for chopping ingredients and setting items down. A microwave can sit nearby as long as it doesn’t interrupt the route between these points.
Each layout shapes the work triangle differently. An L-shaped kitchen puts counters on adjacent walls and can create a natural path between work areas. A U-shaped plan surrounds the cook on three sides, while a galley places work zones opposite each other. In an open plan, an island can add counter space, but poor placement may obstruct movement.
Triangle and Walkway Dimensions
Recommended work-triangle dimensions define the distance between its points and the total length around the route. Each side should measure between 4 and 9 feet, and all three sides together should total 13 to 26 feet. These measurements help you assess whether the refrigerator, sink, and range are close enough for practical movement.
Plan walkways with enough clearance for people to move comfortably around work areas. Check the route with cabinet doors and appliances open, not only on a floor plan. A triangle can meet its measurements yet feel awkward if an island narrows the path.
In U.S. homes, applicable building, electrical, and plumbing codes depend on the project and local jurisdiction. Accessibility planning may also draw on ADA standards: according to the U.S. Department of Justice, the kitchen work-surface height is a maximum of 34 inches (865 mm) above the finished floor or ground.
Costs depend on room dimensions, cabinetry, appliance choices, materials, and project scope; a project price is given after a quote request. For a layout that fits the space, kitchen remodeling can connect design decisions with the work involved in transforming the room.
Arrange cooking, prep, cleaning, and storage zones to follow the order of meal tasks. Keep food storage near the refrigerator, prep space near the cooking zone, and the sink and dishwasher close to both. Store sheet pans near the prep area and oven, and keep containers and wraps near the refrigerator.
Common layout mistakes include placing an island where it disrupts the work triangle, leaving too little clearance for an open appliance door, or crowding a galley kitchen when several people cook. A peninsula can also interrupt traffic flow if it’s poorly positioned. Check how people, doors, and work zones interact before choosing finishes or colors.
Planning appliance and sink placement
Place appliances and the sink according to the tasks they support, rather than treating them as separate choices. Before finalizing cabinetry, show clearances, counter landing areas, ventilation, lighting, outlets, and plumbing on the floor plan.
Appliance and Sink Selection
Choose appliances and a sink to match the kitchen’s cooking, cleanup, and storage needs. The refrigerator, sink, dishwasher, and cooking surface shape daily movement and determine where counter space is most useful. Select models and sink dimensions alongside the floor plan, then account for door swings, handles, and connections before finalizing cabinet positions.
For example, placing the sink beside the dishwasher groups cleanup tasks, while a refrigerator near food storage makes unloading groceries easier. Keep the cleanup zone close to prep and cooking areas, with counter space for ingredients or dishes. If the island includes seating, plan an approach that doesn’t cross the main appliance route.
Appliance Sizing and Placement
Appliance sizing and placement coordinate each model’s dimensions with cabinet openings and usable counter space. A standard dishwasher is 24 inches wide, while many built-in ovens, dishwashers, and refrigerators are 60 cm wide. Specialized models may differ: some ovens reach 76 cm, and large range cookers can span 1.5 meters.
Measure the chosen appliance, including doors and handles, then mark its opening on the plan. Allow at least 15 inches of countertop on each side of key appliances for landing hot items. An oven with French doors needs clearance on both sides, and space near the oven lets you set down hot food without carrying it far.
Ventilation and Appliance Placement
Ventilation planning positions the range hood in relation to the cooking surface and surrounding cabinets. It matters because hood size and height affect how the cooking area is covered. The guide recommends a hood that extends 3 inches beyond each side of the cooking surface and sits 24 to 30 inches above it.
Coordinate hood placement with the range, upper cabinets, and ceiling before finalizing the plan. According to the U.S. Environmental Protection Agency, demand ventilation controls could reduce exhaust system costs by 30 to 50 percent. Natural light can brighten work areas, but planned task lighting should also reach the sink and preparation counters.
Kitchen Utilities Planning
Kitchen utilities planning maps lighting, ventilation, electrical outlets, and plumbing to the places where appliances and work areas will function. Moving a sink or cooking surface can affect utility routes and cabinet arrangements. Mark the sink and dishwasher together, then place outlets near planned small-appliance spaces.
Place lighting where hands and appliances won’t cast shadows across the work surface. Keep the cooking area aligned with its hood, and plan plumbing around the sink and dishwasher positions. Review the utility plan with appliance specifications before construction begins; kitchen remodeling brings these layout decisions into the broader room plan.
Kitchen layout planning
Before renovating, measure the room, map doors and windows, list cooking and storage needs, and compare floor plans against daily tasks. Mark cabinets, appliances, pantry storage, and clear paths to see how each arrangement uses the floor. A kitchen layout planning guide helps turn these measurements into a plan you can evaluate before choosing finishes.
Start with fixed elements, including openings, plumbing locations, and natural light. Then choose a layout that supports cooking, cleanup, and storage without blocking movement. A one-wall kitchen typically requires 8-10 feet in width, while an island plan needs room for cabinets and walkways around it. Sketching these elements together shows where the available space becomes tight.
For an island layout, the kitchen should be approximately 12.5 to 13 feet from wall to wall to fit cabinetry on both walls and walkways on either side. An average island measures 3 by 6.5 feet, but its footprint must suit the actual room. Preserve at least 42 inches of walkway clearance around an island; 48 inches is the standard distance between an island and perimeter cabinets.
Countertops should support preparation and movement. A 12-inch overhang can provide seating, with 24 inches of counter width per barstool. Add those dimensions to the floor plan before choosing an island, since seating can compete with counter space and circulation. Mark appliance openings and door swings, too, so the visual plan reflects how the room will function.
Work-surface height is another early decision. The recommended kitchen counter height is 34 to 36 inches. According to the U.S. Department of Justice, ADA standards set the kitchen work-surface height at a maximum of 34 inches (865 mm) above the finished floor or ground. Account for this when planning accessible work areas.
Use this kitchen layout planning guide to compare options in sequence:
Record room dimensions, doorways, windows, and fixed utility locations.
Place cooking, cleaning, preparation, and pantry areas around their tasks.
Mark cabinets, countertops, appliance openings, and walking routes.
Test island size, seating, and clearance before selecting finishes.
Compare floor plans visually, not just by cabinet count. An island may add storage but reduce open floor space; a peninsula can provide seating while dividing adjacent areas. Consider available space, workflow, storage, entertaining, natural light, and ventilation together. A kitchen layout planning guide is most useful when you compare these trade-offs with your household’s actual routines.
Use your measured plan to shape the renovation around how your household cooks and gathers. Plan your kitchen project with those priorities in view, so layout, cabinetry, and usable space are considered as connected decisions.
DK Production Restoration: Restoration
DK Production Restoration provides water damage restoration for homeowners whose kitchens have been affected by water. When damage disrupts cabinets, flooring, or remodeling plans, water mitigation and restoration address the damage, while reconstruction helps return affected areas to use.
Consider restoration when water damage disrupts everyday kitchen use or changes the scope of planned improvements. Separating damage repair from layout decisions helps clarify what needs restoration and what belongs in a future kitchen plan.
For help with water damage restoration or reconstruction, contact DK Production Restoration.
Make the Next Kitchen Decision with Confidence
A useful kitchen plan should support how your household lives, not just look polished on paper. Before moving from ideas to renovation, bring together your measured floor plan, appliance choices, and storage priorities. This gives each decision a clear purpose and helps you see where practical trade-offs may affect daily routines.
Use this kitchen layout planning guide as a starting point, then adapt the plan to your home and needs. If water damage has affected the kitchen, restoration may need to come before layout changes. DK Production provides water mitigation, restoration, and reconstruction to help address the damage and disruption.
For support with the next step, contact DK Production Restoration. A clear plan can help you move forward toward a kitchen that feels more functional and ready for everyday life.
Frequently Asked Questions
What’s a Kitchen Floorplan?
A kitchen floor plan is a scaled drawing of the room’s boundaries and the locations of cabinets, appliances, doors, and windows. It helps you compare arrangements before work begins. In a Snohomish home, mark fixed features such as a window over the sink or a doorway beside the refrigerator, then sketch the proposed cabinet runs. This can reveal conflicts before they affect construction decisions.
What are the main kitchen layout types and their pros and cons?
Common layouts include one-wall, galley, L-shaped, U-shaped, G-shaped, peninsula, and island designs. A one-wall plan suits a compact or open room but offers less wall space; a galley uses parallel runs efficiently but may feel tight when several people cook. L-shaped plans open up traffic flow, while U-shaped designs offer substantial storage. Islands and peninsulas add workspace or seating, but can obstruct movement if poorly placed.
How do you choose the right kitchen layout for room size and household needs?
Choose a layout by matching the room’s shape and fixed openings to how people cook, store food, and gather. A narrow room may suit a galley, while an open room may fit an island if routes remain clear. Consider whether several people cook together, where groceries are unloaded, and whether pantry storage or seating matters most. In Snohomish homes, begin with a measured plan of the actual room, not a generic template.
What are standard kitchen cabinet, countertop, and appliance dimensions?
Common planning references include 24-inch base cabinet depth, 12-inch upper cabinet depth, and a 4-by-4-inch toe kick. Countertops are typically 2 to 3 centimeters thick, and recommended counter height is 34 to 36 inches. A standard dishwasher is 24 inches wide. Appliance dimensions vary: many built-in models are 60 centimeters wide, so use each selected model’s measurements when laying out openings and adjacent counters.
How much does kitchen layout planning and remodeling cost in the United States?
Costs vary with room dimensions, cabinetry, appliance choices, materials, and project scope. The guide recommends budgeting 5% to 15% of a home’s value for a new kitchen, plus around 10% for unexpected costs; a project price is provided after a quote request.



Comments